Somebody else typed this classic/obscure dungeon up, but unfortunately left if in raw HTML for some reason, so this post is to rectify that. It did a couple things to enhance it too.
Hit the print-friendly button at the bottom of the post to have your own PDF, dudez.
Background
Many years ago, the Shrine of Kollchap flourished. Priests of Chaos made human sacrifices and their servitors raided the lands around for new victims to satisfy the thirst of the Chaotic god. The villagers, at first, were too terrified to do anything, but at length collected a small army and appealed to the King for aid. He sent only his champion, Amaul, bearing The Sword of The Sorcerer. Together, they marched to Kollchap and drove out the priests and their allies. Amaul, however, was killed in the assault and the sword has never been seen again. Just recently, the Priests of Chaos have begun to re-occupy Kollchap and some villagers have been abducted. If the Sword of the Sorcerer were to be recovered, the shrine could once again be cleared out and, this time, finally destroyed.
Above Ground
2 Hobgoblins (AC 6; Hit Points 2, 6; MV 90'; Attacks 1; Damage 1-8; Save F 1; ML 8; Chaotic)
When the players arrive, they will see what appears to be the remnants of a Grecian-style temple. Pillars are broken down and the roof is badly cracked, but there are signs of rebuilding. The middle of the temple is bare and at the far end there is an irregular hole in the stone floor. The hole is slightly larger than a manhole (four feet in diameter) and is large enough for a man to pass through with ease. Lurking in the ruins are two ugly humanoid creatures with earth brown skin (Hobgoblins). They will observe the party from a distance and will not attack unless anyone tries to climb through the hole or they themselves are attacked.
Entrance
11 Normal Bats (AC 6; Hit Points all 1; MV 120'; Attacks Confusion; Damage Nil; Save Normal Man (NM); ML 6; Neutral)
The hole leads down about forty feet and ends in a tunnel. Although the descent is not vertical, it is still fairly steep and unlit, and so characters attempting to climb down it without taking suitable precautions, such as using a rope, may well fall. Roll Dexterity or less on a d20 to avoid this. Additionally, any character hit in combat while trying to get down the hole must roll five or six on a d6 to avoid falling. A fall will cause a character to take 1d6 damage.
The tunnel is ten feet high and there are many stalactites and stalagmites along its length. After about thirty feet the party will disturb a nest of bats. These will fly at the party and cause confusion. If any character engages in combat-- with a wandering monster, for example--while the bats are flying around his head, he will have a penalty of 2 on his 'to hit' roll. No spells can be cast in this confusion.
The Dungeons

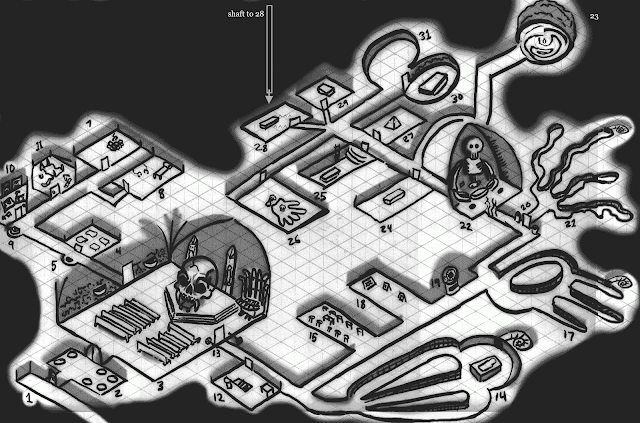
General: The majority of passageways in this dungeon are five feet wide except for those leading on to the central Sacrifice Room (12), which are ten feet wide. They are all ten feet high, and walls, floors and ceilings are made of stone. There are no light sources in any passageways. Unless otherwise stated, doors are six feet high and three feet wide and made of oak. They open into rooms; and doors between two rooms open into the higher-numbered room. All doors must be opened in the normal manner (i.e. Base Chance of 1-2 on d6).
1. Orc Guardroom
4 Orcs (AC 6; Hit Points 3, 2, 3, 8; MV 120'; Attacks 1; Damage 1-6; Save F 1; ML 8; Chaotic)
In this room are two sets of bunk beds (one in the north-east and one in the south-west) covered with filthy sheeting. In the center is a large (five foot by ten) battered table. The room is strewn with bones, straw and other debris. The Orcs, if they hear a party making much noise, will wait until the party passes by and
attack from behind, using the secret door. One Orc will generally be guarding the door, the others lying on their bunks. The room contains no treasure other than that which the Orcs carry (2, 11, 7, and 9 eps respectively). Characters will not find this unless they search the bodies.
2. Rubbish Dump
5 Giant Rats (AC 7; Hit Points 4, 3, 1, 3, 2; MV 120'; Attacks 1 bite; Damage 1d3+disease; Save F 1; ML 8; Neutral)
This room is used by the inhabitants of the dungeon to dispose of all unwanted materials, waste and so on. It is filled with broken furniture, bones, shards of pottery, rotting rope, clothes, decaying food, broken weapons and other sorts of debris. The stench is quite powerful but not overwhelming. Characters
searching around in the debris will disturb the Giant Rats, who will then attack. If their morale fails they will flee into the rubble. If players carry on searching the rats will attack until
death. In the rubble is a total of 216 silver pieces but it will take one turn to collect it.
3. Floor-less Room
No Monsters
This room was once the entrance to the main part of the shrine. Only the priests were allowed beyond it. The floor has now fallen in and the door is rotten. If anyone kicks the door it will collapse and they will fall through and down ten feet into a pit, taking 1d6 damage. The door on the other side is closed but there
is a small ledge in front of it, wide enough for one character to stand there safely.
4. Corridor Trap
Green Slime (AC may always be hit; Hit Points 4; MV 3'; Attacks 1; Damage corrosion; Save F1; ML 12; Neutral)
The Slime is clinging to the west wall and will, if not noticed, fall on a party member (determined randomly). Green Slime is only hurt by fire or cold and dissolves wood or metal in 6 rounds. In rounds thereafter the victim tums into Green
Slime unless the monster is burnt off (burning damage goes half to the Slime and half to the character).
5. Storeroom
First-Level Thief (Belisarius; AC 7; Hit Points 2; MV 90'; Attacks 1; Damage 1-8; Save T 1; ML 6; Neutral)
This room was once a storeroom for the temple, but now there is only a heap of packing cases against the north wall. Some moldy food remains at the bottom of the cases. The room elsewhere is bare, but characters removing the packing cases and then searching for secret doors may find a sliding panel. Through the secret door is Belisarius (ST 9; INT 11; WIS 12; DEX 15; CON 9; CHR 11), one of the survivors of an NPC. party. Starved and afraid, he is hiding here until he plucks up enough courage to escape. If offered aid he will join the party but not enter into any very dangerous combat. He will tell the party that his party, consisting of a
female Halfling Fighter, a Human Fighter and himself, were set upon by a band of Clerics. They tried to flee but the Halfling was
captured and he knows nothing of the Human Fighter's fate. He knows of the Orcs and the secret door in Room 1.
6. Healing Pool
No monsters
This pool is circular with a radius of about three feet. The water is deep (c. 10 feet) and has a greenish tint. The water has healing qualities and, if half a pint is drunk, 1-6 hit points of
damage will be healed. (Note that hit points cannot be increased above original number by this method.) The liquid, however, reacts
with daylight and if exposed above ground will turn into a mild poison, doing 1d6 hit points damage.
7. Coffin Storeroom
No monsters
This room is bare except for fifteen plain wooden coffins stacked in threes around the walls. Each is about six feet long and two feet wide.
8. Odric'S Bedroom
1 Ghoul (AC 6; Hit Points 10; MV 90'; Attacks 2 claws/1 bite; Damage 3 x 1-3 + paralysis; Save F 2; ML 9; Chaotic)
This room has a sumptuously furnished bed with silk sheets and hangings. Elsewhere there are various cupboards and wardrobes
containing various articles of clothing, cups, pots and so on. At point A is a Ghoul, Odric's 'pet'. It serves him as it knows he can kill it. It will attack any intruders and will fight
to the death. The various sheets, clothes and vestments are worth 100 gps if sold, but weigh 200 coins. The outline of the secret door can be made out but the door may not be opened unless a lever underneath the bed is pulled.
9. The Office
Fourth-level Cleric (Arch-deaconess of Tranfax; AC 2; Hit Points 14; MV 30'; Attacks 1 mace; Damage 1d6; Save C 4; ML 10; Chaotic)
This room serves as Odric's office. In the center is a table and chair. On the table is a mass of papers. Players searching the table will, 20% of the time, find a map of the whole dungeon. The other papers are of little interest. Just beside the
table is a covered pit which leads ten feet own to a tunnel to area 18. The pit has a handle on its cover and metal rings in the wall leading down. Sitting in the chair is the Arch-deaconess (ST 11 ; INT 12; WIS 15; DEX l0; CON 7; CHR 10; Spells - Light, Protection from Evil, Hold Person). She has been sent by her superior to recover the statue of Tranfax, which has been stolen by Odric (see Room 21). She will ask any party not attacking if they know where the statue is, and if so, will ask them to guide her. If not, she attacks the party, calling upon the aid of
the Rockmen in Room 9a. In the north wall is a hole where the wall has collapsed and through this the characters can reach Room 9a.
9a. Collapsed Room
2 Rockmen (AC 5; Hit Points 5, 8; MV 90'; Attacks 2; Damage 1-4, 1-4 + Petrification; Save F 1; ML 12; Chaotic)
The Rockmen (see Chapter 3) are rummaging around in this room to see if the statue is buried beneath the rubble. If called upon by the Arch-deaconess they will rush into attack until called
off. They have been loaned by Khan to the people of Tranfax to aid in the search for the statue. There is nothing under the rubble in
this room.
10. Underpriests' Room
- 2 First-level Clerics
- 1 Second-level Cleric
- (AC 2 (all); Hit Points 5, 3, 10 respectively; MV 30'; Attack 1 mace; Damage 1d6; Save C 1, C 1, C 2; M L 7; Chaotic)
This room is used by the three Clerics as a base and to sleep in. Here they perform all their meditation and rituals. They are only loosely connected with Odric (see Room 12), accepting his leadership only to reclaim the shrine for Chaos. Stacked against the wall are three bundles of sheets, clothes and other
possessions of the Clerics. The senior Cleric (Kithar: ST 9; MT 9; WIS 14; DEX 11; CON 14; CHR 10; Spell - Cure Light Wounds) is
standing up clasping a silver hemisphere (about one foot in diameter), the symbol of their cult. The other two (Kerzen: ST 12; INT 7; WIS 15; DEX 9; CON 9; CHR 10; and Ojar: ST 9; INT 9; WIS
19; DEX 11; CON 14; CHR 10) are kneeling in prayer. All are wearing green and white robes and will attack any intruders refusing to surrender. The walls of the room are painted with scenes of religious processions. If forced to flee, the Clerics will try to take the hemisphere with them. It is not solid silver, but is worth about l00 gps.
11. Room of Absolution
1 Bugbear (AC 5 ; Hit Points I l ; MV 90 ' ; Attacks 1 ; Damage 2d4; Save F 3; ML 9; Chaotic)
This room is almost wholly bare except for six large (five-foot-high) urns along the south wall. These contain what appears to be normal water. It is the water with which Odric must wash his
hands after any sacrifice. The Bugbear is set to guard the urns and will attack any party entering the room. The urns can be smashed with crushing weapons (maces, etc.). In the bottom of each is a pearl worth 60 gps. Any Chaotic priest who sees a pearl will recognize it and will automatically attack the party. The Bugbear has 76 sps in a pouch.
12. Great Sacrifice Chamber
- 3 Skeletons (AC 7; Hit Points 6, 2, 8; MV 60'; Attacks 1 scimitar; Damage 1d8; Save F 1; ML 12; Chaotic)
- 1 Gecko (AC 5; Hit Points 14; MV 120'; Attacks 1 bite; Damage 1d8; Save F 2; ML 7; Neutral)
- Third-level Cleric (Odric; AC 3; Hit Points 9; MV 30'; Attacks 1 mace; Damage 1d6; Save C 3; ML l0; Chaotic)
- First-level Fighter (Rosa Dobbit; AC 9; Hit Points 4; MV 120'; Attacks 1; Damage 1d6; Save F 1; ML 8; Lawful)
This room is vast. There is a pole in the center which leads right up to the ceiling. Chained to this is a Gecko (a five-foot-long lizard). The door is divided into two sections: a huge green circle and a white area at the corners. The Gecko's chain precludes it from the white area. In each of the south, east and west corners, there is a skeleton armed with a scimitar. In the north comer is Odric, dressed in black robes, with Rosa Dobbit, the Halfling Fighter. Odric is just about to drag her towards the Gecko to be eaten alive, the cult's normal mode of sacrifice. On the party's intrusion Odric will order the Skeletons to attack the party and then he will attempt
to sacrifice the maiden. The Gecko will attack anyone in the circle except for Odric. If the combat looks hopeless, Odric will
unchain the Gecko and attempt to flee through Room 15. If killed, Odric has the keys to the cells (Room 13) and to his treasure chests (Room 14) and also 30 gps in cash. If rescued, Rosa will
join the party, in gratitude.
The scimitars which the Skeletons use are specialized weapons and if any character tries to use them he will be at a -2 penalty on all combat rolls. It requires a week's training to master the weapon.
13. The Cells
2 Zombies (AC 8; Hit Points 6, 5; MV 120'; Attacks 1 ; Damage 1d8; Save F 1; ML 12; Chaotic)
There are three cells, each separated by bars from the area where the Zombies stand guard. The cells are all locked. Anyone, except Odric, coming this way will be attacked by the zombies. Two of the cells are crowded, each with four decrepit-looking male Humans. If the Zombies are killed and the party has the keys, the prisoners may be freed. Seven of the prisoners are villagers, but the eighth is a wealthy merchant who will reward the adventurers with 50 gps if he is conducted safely out of the dungeon.
14. Treasure Chamber
1 Giant Centipede (AC 9; Hit Points 2; MV 60'; Attacks 1 bite; Damage Poison; Save NM; ML 7; Neutral)
The door to this room is locked. Odric has the key. Inside are four copper-colored chests about three by two by two feet against the east wall. Hidden between two of them is a Giant
Centipede. Chest 1 is open and appears to be empty. There is, however, a false bottom under which there are 3,000 sps. The other three chests are locked (trying to smash the lock with a weapon will be effective but there is a 20% chance of breaking the weapon and rendering it useless). The locks on chests 3 and 4 are
poison trapped. Chest 3 Save versus Poison or be paralyzed for 2d4 hours. Chest 4 Save versus Poison or die, in 10 minutes, unless Cure Light Wounds spell is cast, in which case the victim is helpless for 1-6 weeks. In chest 2 there is a golden statuette worth 300 gps. In chest 3 there are l ,000 gps and two gems worth 150 gps each. In chest 4 there are three scrolls - one
of Protection from Evil and two of Cure Light Wounds.
15. Changing Room
No monsters
This room is used by Odric for changing into his sacrifice robes. The room is bare except for a large chest. In this there are a number of clothes, all either green or white. There is a
secret door at the back of the room which leads into the rear corridor. The stairs lead up into the upper world.
16. Old Waiting Room
No monsters
This room was once a waiting room for the oracle in Room 17. There is a table and a bench round the walls. There is some junk (paper, broken chairs and so on) on the floor. There is
nothing of value here.
17. Oracle Room
No monsters
This room used to be an oracle room where people would come with their questions and the god would answer them. There is a statue of a seven-foot-high human by the west wall. In his hands is an alms dish on which is inscribed, in Common, the word 'Offerings'. Behind the statue are red curtains from ceiling to floor.
18. Pit Trap
No monsters
At this point the floor is covering a pit. Anyone stepping on to space directly over it will fall through, taking 1d6 damage. The pit used to be a tunnel but the handholds leading down have come away from the wall. The tunnel leads to Room 9.
19. Goblins' Room
4 Goblins (AC 6; Hit Points 4, 3, 6, 4; MV 60'; Attacks 1 ; Damage 1-6; Save NM; ML 7; Chaotic)
The room is very stark, with only straw for bedding, on the floor. The room smells pretty terrible and sitting on the straw are four Goblins. They will attack any party which enters the room. If their confidence fails, they will flee through whichever door the party did not come through and then return to their room
by the other door a few minutes later, having run through the corridors and jumped over the Pit Trap at 18. There is a large wooden chest against the west wall which is unlocked and it
contains 23 gps, 570 sps and 3,004 cps. The Goblins have, in pouches, 6 sps, 7 sps, 2 eps and 3 sps respectively.
20. Cave
2 Cave Locusts (AC 4; Hit Points 9, 3; MV 60'; Attacks 1 bite, 1 bump or 1 spit; Damage 1d2 or 1d4 or special; Save F 2; ML 5; Neutral)
This room is a cave littered with rocks and boulders. The walls are damp and the atmosphere is humid. Amongst the rocks are two Cave Locusts, but because of their Grey color they may not be noticed at first. In the entrance of the cave there is the body of a human in plate mail. He was one of Belisarius's party (see Room 5). In his hands are a sword and a burnt-out torch. There is nothing of any value on the body except a map, showing Rooms 1, 2 and 5. There is no treasure in the room.
21. Statue Room:
One-way door
The door in the east wall is a sliding block, with a handle on the outside but no handle on the inside. The door is spring loaded so that after sixty seconds it will slam shut and be impossible to open from the inside. In the center of the room is a statue of a man with his hands held out in benediction. Around the plinth on which the statue stands there are some question marks. There are no apparent exits from the room. If any character says the word 'How', the statue will speak the following words:
I answer questions, three a day
Put not your trust in all I say;
If your queries lengthy be
Then I will speak confusingly.
It will answer three ‘How' questions as long as each one contains twelve or fewer words. One answer will be false (determined randomly). If the questions are too long the answers
will be nonsense. There is a secret door in the west wall.
22. Meditation Room
No monsters
This room was originally a meditation room, where priests could come and reflect on life for hours at a time. It is now completely bare of furniture but the walls are ornately decorated with paintings of Halflings being tortured and maimed!
23. Flooded Storeroom
1 Lizardman (AC 5, Hit Points 1; MV 60'; Attacks 1 sword; Damage Weapon + 1; Save F 2; ML 12; Neutral)
Sound of rushing water
The stairs leading down are wet and so anyone going down them, without taking care, will have to Save versus Dexterity or fall,
taking 1d3 damage. The first thing that strikes the characters, when they enter this room, is the dazzling light. A hole in the ceiling lets in natural sunlight and, for the first round,
characters will fight at -2 on all combat die rolls. When their eyes grow accustomed to the light, the characters will see a flooded room with a few rocks sticking out of the water on the
far, south, side. In the water there are broken barrels and wooden cases. Fish bones and other debris lie on the bottom few steps. Sitting on a rock is a Lizardman. Behind the rock are 5 cps
in a leather bag, and the Sword of the Sorcerer. This is a + 2 sword which emits a low humming sound when it is within twenty feet of any Chaotic creature.
----
Want to give feedback? Share this on g+ and give me a tag (+claytonian JP) (if you want to keep it private, share with only me).
If you spot a typo or don't have g+, you can just email me. Claytonian at the gmails.


